Failover Cluster Checklist

This post is being reworked for Windows 2019

Introduction

OK, so you want to install a cluster? This is not a “Should I build a cluster?” post, this is a “How to build a proper cluster” post. I like checklists, so I made a Windows Failover Cluster installation checklist. Some of the points have their own post, some are just a short sentence. I will add more details as time allows. The goal is to share my knowledge about how to build stable clusters. I may disagree with other best practices out there, but this list is based on my experience, what works in production and what does not. I use it to build new clusters, as well as troubleshooting clusters made by others. Clustering is so easy that anyone can build a working cluster these days, but building a stable production worthy cluster may still be like finding you way out of a maze. A difficult maze filled with ghosts, trolls and angry badgers.

There are some things you need to know about this post before you continue reading:

  • This list is made for production clusters. There is nothing stopping you from building a lab using this list, but if you do as I say, you will build a very expensive lab.
  • I work with SQL Server, Hyper-V and File clusters. This list may work for other kinds of clusters as well, but I have not tested it on recent versions.
  • This list was originally published in 2014 for Windows 2008R2 up until Windows 2012R2. It os now updated for Windows Server 2019. I will try to add version specific instructions when necessary.
  • This list is for physical clusters. I dislike virtual clusters, because most organizations are not clever enough to create functioning virtual production clusters that won’t fail miserably due to user error someday. (By “virtual clusters” I mean cluster nodes on top of hypervisors, not clustered hypervisors). It is however entirely possible to build virtual clusters using this list, especially if you employ technology such as Virtual FC.
  • This is my checklist. I have spent more than a decade honing it, and it works very well for me. That does not guarantee that it will work for you. I welcome any comments on alternative approaches, but don’t expect me to agree with you.
  • This list is mostly written in a “How to do it” manner, and may be lacking in the “But why should I do it” department. This is due to several reasons, but mostly a lack of time on my part. I do however want you to know that there are several hours, if not days of work behind each point.
  • Updates will be made as I discover new information.
  • The list is chronological. That is, start at the top and make your way down the list. If you jump back and forth, you will not achieve the desired result.
  • This list is based on the GUI version of Windows Server, not Core. You can build clusters on core, but I do not recommend it. Clusters may be very finicky to troubleshoot when things go wrong, and doing so on Windows Core is like trying to paint a room through the keyhole.
  • Understanding this list requires knowledge of Active Directory and basic knowledge of Failover Clustering.
  • There are many special cases not covered. This list is for the basic 2-10 node single datacenter cluster. The basic rules still apply though, even if you have nodes in four datacenters and use a hybrid cloud setup.

The design phase

In the design phase, there are a lot of decisions you have to make BEFORE you start building the cluster. These are just a few of them:

  • How many nodes do you need? Remember you need at least one node for HA (High Availability). Depending on the total number of nodes you may need several standby nodes. Some managers will complain about the extra nodes just sitting there unused, but they forget that they are there to provide HA. No matter the number of nodes, make sure the hardware is as equal as possible. I don’t care what the manual says, having cluster nodes with different hardware in them is a recipe for disaster. If possible, all nodes should be built on the same day by the same persons and have consecutive serial numbers.
  • How many network fabrics do you need? And how many can you afford? See Networks, teaming and heartbeats for clusters for more information. This is where most troublesome clusters fail.
  • Will you use shared storage? And what kind of shared storage? In short: FCOE is bad for you, ISCSI is relatively cheap, SMB3 is complicated and may be cheap, shared DAS/SAS is very cheap, FC is the enterprise norm and infiniband is for those who want very high performance at any cost. In most cases you will have to use what is already in place in your datacenter though. And it is usually better to have something your storage guys are used to supporting. Just remember that storage is very important for your overall performance, no matter what kind of cluster. For file clusters, high throughput is important. For SQL Server, low latency is key and you should use FC or infiniband.
  • What kind of hardware should you use in your cluster nodes? Currently, these are my opinions, based on my personal experience. As mentioned above, these are my opinions, you may come to other conclusions. My opinions on this change frequently as new generations are released, but here goes:
    • Emulex should stop making any kind of hardware. It is all bad for you and bad for your cluster. If you are having trouble with cluster stability and you have Emulex made parts in your nodes, remove them at once.
    • QLogic make good FC HBAs. If you have a FC SAN, QLogic HBAs are highly recommended. If you have QLogic network adapters on the other hand, use them for target practice.
    • Broadcom network adapters used to be good, but the drivers for Windows are getting worse by the minute.
    • Intel X520 is my current favorite network adapter.
    • Use Brocade FC switches only. They are sold under many other brand names as well, I have seen them with both HP and IBM stickers.
    • Use Cisco or HP network switches, but do not use them for FC traffic.
    • Make sure your nodes have local disk controllers with battery or flash backed cache. Entry level disk controllers are not worth the cardboard box they are delivered in.
    • Intel Xeon CPUs currently reigns supreme for most applications. There are however some edge cases for SQL Server where AMD CPUs will perform better. I recommend reading Glenn Berry’s blogs for up to date SQL Server CPU information.
    • HP, IBM and Dell all make reasonably good servers for clustering. Or, I should say equally bad, but better than the alternatives.
  • RACK or Blade?
    • RACK servers
      • are easier to troubleshoot
      • are versatile
      • give you a lot of expansion options
      • are cheaper to buy
    • Blade servers are
      • space efficient
      • cheaper to maintain if you rent rack space
      • easier to install
      • limited in terms of expansion options
  • Where should your nodes be located physically? I do not recommend putting them all in the same rack. The best solution is to put them in separate rooms within sub-millisecond network distance. You can also place them in separate data centers with a long distance between them if you do not use shared storage or use some kind of hybrid solution. I do not recommend SAN synchronization to data centers far, far away though, it is better to have synchronization higher up in the stack. If you only have one datacenter, place the nodes in different racks and make sure they have redundant power supplies.
  • Talking about power, your redundant power supplies should be connected to separate power circuits, preferably with each connected to an independent UPS.
  • What domain should your servers be member of, and which organizational unit should you use? Failover clustering will not work without Active Directory. The Active Directory role should NOT be installed on the cluster nodes. You should have at least two domain controllers, one of which should be a dedicated physical machine. I know that MS now supports virtualizing all your domain controllers, but that does not mean that you should do it, or that it is smart to do so. I would also recommend creating a separate OU for each cluster.
  • What account should you use to run the installation? I would recommend using a special cluster setup account, as some cluster roles latch on to the account used during installation and become unstable if that account is deleted at a later date. The account should be a domain administrator, and should be set to automatically deactivate at some point in the near future after you are done with the cluster setup. You can then re-activate it for the next cluster installation by changing the expiration date and password.
  • And then there are a lot of product and project specifics, such as storage requirements, CPU and memory sizing and so on, all of which may affect your cluster design.

The actual checklist

All list items should be performed on each node in the cluster unless specified otherwise. You can do one node at the time or all at once until you get to cluster validation. All nodes should be ready when you run cluster validation. I find it easiest to remember everything by doing one list item for each node before I move on to the next, making notes along the way.

  • Install Windows Server
  • Copy any required media, drivers etc. to a folder on each node
  • Activate a machine proxy if you use a proxy server to access the internet. See Proxy for cluster nodes for more information.
  • Check whether the server is a member of the domain, and add it to the domain if necessary
  • Make sure all your drivers are installed using Device Manager
  • Make sure you are running current BIOS, Remote Access, RAID, HBA and Network firmware according with your patch regime. If in doubt, use the latest available version from your server vendor. Do NOT download drivers and firmware from the chip vendor unless you are troubleshooting a specific problem.
  • Make sure your drivers are compatible with the firmware mentioned above.
  • Add the failover cluster features:
    Install-WindowsFeature -Name Failover-Clustering –IncludeManagementTools
  • If this is a Hyper-V host, install the Hyper-V role
    Install-WindowsFeature –Name Hyper-V -IncludeManagementTools -Restart
  • Verify your network setup. Networks, teaming and heartbeats for clusters
  • Check network adapter names and binding order. The public interface (the one facing the domain controllers) should be at the top of the binding order, and adapters should have the same name on each cluster node.
  • Disable IPv6. See How to disable IPv6
  • Remove duplicate persistent routes. Details
  • Disable NICs that are not in use
  • Install any prerequisites required by your shared storage. Check with your SAN admin for details.
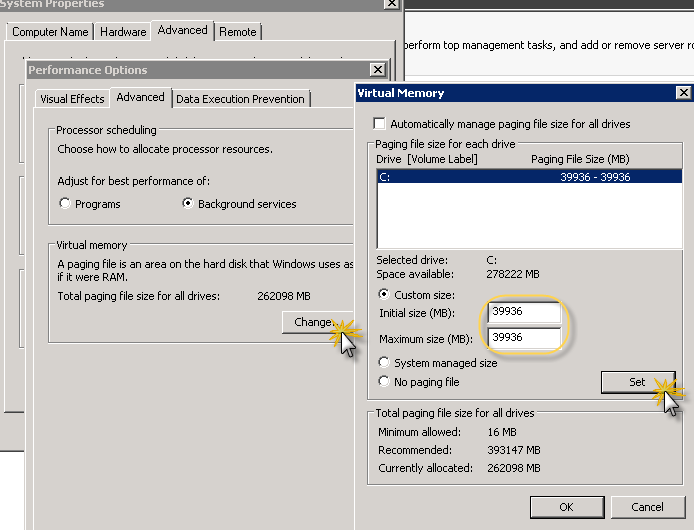
  • Change page file settings according to Page file defaults
  • Activate Microsoft Update http://update.microsoft.com/microsoftupdate
  • Run Windows update
  • Install cluster hotfixes. See Does your cluster have the recommended hotfixes?
  • Select the High Performance power plan, both in Windows and in the BIOS/UEFI
  • Verify automount settings for Failover Clustering
  • If you are using shared storage, verify storage connections and MPIO in accordance with guidelines from your SAN vendor. Most SAN vendors have specific guidelines/whitepapers for Failover Clustering.
  • If you are creating a Hyper-V cluster, this is the time to create a virtual switch
  • Validate the configuration: Validating a Failover Cluster. Do not continue until your cluster passes validation. I have yet to see a production cluster without validation warnings, but you should document why you have each warning before you continue.
  • Create the cluster: Creating a Failover Cluster
  • Verify the Quorum configuration. If you are using Windows 2012, make sure dynamic quorum is enabled. If you use shared storage, you should always have a quorum witness drive (even if you don’t use it). The create cluster wizard will without fail select another quorum witness drive than the one you intended to use, so make sure to correct this as well.
  • Grant create computer object permissions to the cluster. This is necessary for installation of most clustered roles, and this is why each cluster should have its own OU.

Creating a Failover Cluster

This post is part of the Failover Cluster Checklist series.

Create cluster

Start the Create Cluster wizard from failover cluster manager or from the Validate Cluster wizard results page. First specify the servers that will be nodes in the cluster. Then, you need to supply a valid static IPv4 or IPv6 address and a Virtual Computer Name. The IP address has to be in a network that has access to a writable domain controller, and all nodes needs to have a NIC with an IP in this subnet. (unless you are creating a disjointed cluster with nodes in different subnets which makes everything more difficult and is not part of this post at this time)

SNAGHTML6fe91b

Set disk names

In Failover Cluster Manager, any shared storage will be listed as Cluster Disk 1, Cluster Disk 2 and so on

SNAGHTML755673

You should change this name to reflect the volume name or drive name if you for some strange reason chose to have more than one volume per drive.

Set network names

Same goes for network names, Failover Clustering will just name them Network 1, Network 2 and so on. I like using Vlan numbers and functional tags like Public, Internal, Live Migration and so on. The important part is that you should instantaneously know what network is which. You should also define which networks are available for client connections. the cluster will assume that networks with a default gateway is client facing, while networks without a gateway is for internal use. If you use iSCSI, disable all cluster traffic on the iSCSI networks.

image

Validating a Failover Cluster

This post is part of the Failover Cluster Checklist series.

Validation process

Beware: Running cluster validation may cause failovers or offline cluster resources. 

Running cluster validation in production is not recommended, especially if you are troubleshooting an unstable cluster. I once took down a six-node Hyper-V cluster by running validation. It broke the storage connection to all nodes, and all the VMs crashed as a result. I recommend scheduling an outage, or at least informing the powers that be before you press the validate button.

  • Start the “Validate Configuration” wizard

clip_image002

  • Add servers. If you run this wizard on an existing cluster, the existing cluster nodes may be pre-added. Make changes as necessary.
  • Select “Run All tests”
    clip_image005
  • Wait for the test to complete (5-60 minutes depending on configuration)

If you are troubleshooting a specific validation error or warning, re-running a full validation test may be time-consuming. Try re-running just the failing test until you get it working again, but remember to run a full validation afterwards to make sure you haven’t “fixed” something else.

Common errors in the report

Software updates missing, Validate software update levels

You can usually ignore this on a new cluster, as you should run windows update after installing the cluster anyway. On an existing cluster, fix as soon as possible. Sometimes, this rule will generate false positives due to the cluster nodes not being patched at the same time. This may lead to different KB numbers as one update may supersede another. You may have to remove patches from some nodes to correct this.

SNAGHTML664cc8

More than one VLAN on the same MAC address due to teaming.

Also known as a Converged networking setup. Not recommended. Make sure you have at least 2 completely independent networks.

Node reachable by only one interface

Make sure the network is highly available (NIC TEAM).

SNAGHTML68598f

No disks

clip_image008

This is normal if you have a cluster configuration without shared storage. Otherwise, this warning points to mis-configured storage.

MPIO related errors or warnings

The SAN connection is mis-configured or faulty, or you need a DSM update. Check with your SAN admin.

SCSI-3 persistent reservations

SNAGHTML69b3e0

Your SAN does not support clustered storage pools with the current firmware. If you do not plan to use storage pools in your cluster, this warning can safely be ignored.

Verify automount settings for Failover Clustering


This post is part of the Failover Cluster Checklist series.

 What to do

For Windows 2008 automount should be disabled, for 2012 it should be enabled by default. If you have drive letter assignment problems, try disabling automount.

You can check and change this setting from an elevated command prompt:

  • Diskpart
  • Automount
  • Automount disable/enable

Sample from Windows 2012:

clip_image001

Why

Automount can cause several issues in failover clusters, mostly related to drive letter and mount point mappings. The issues are more prevalent when using iSCSI storage due to the way iSCSI volumes are mounted. If you have FC storage where the LUN IDs are different on the cluster nodes, similar problems may occur. FC LUN IDs are configured in the SAN interface, not on the server.

  • I have experienced issues on Win 2008 and 2008R2 where the drive letter mappings of cluster disks change on failover if automount is enabled. I have seen volumes that are configured with a mount point suddenly being assigned a driveletter instead on failover, thus resulting in a failed resource. Cluster services may fail or behave erratically, as there are settings and configuration items who are bound to drive letters.
  • When you add storage to a cluster, automount could assign a driveletter to the new volume that is already in use on another node. This may lie dormant for quite some time, until you try to fail over the two drives to the same node. Failover cluster validation will spot this error.

I have yet to experience any automount related issues on Windows 2012, thus the reccomendation to keep automount enabled. The default setting is enabled, both on Win2008 and Win2012.

Page file defaults

This post is part of the Failover Cluster Checklist series.

For servers with a large amount of RAM, the page file may get very large if you do not change the default settings. Such a large page file is rarely required. To get a more sensible starting point, calculate a page file size using the following formula, and set a fixed page file size.

8GiB + 1GiB for each 8 GiB above 8GiB.

64GiB RAM 8 + (64-8)/8 = 15 15*1024=15360
128GiB RAM 8 + (128-8)/8 = 23 23*1024=23552
256iGB RAM 8 + (256-8)/8 = 39 39 * 1024 = 39936
384GiB RAM 8+(384-8)/8 = 55 55 * 1024 = 56320

I cannot remember where I first saw this formula, but I have seen it used in several posts and books. The actual value is not really important anymore, the most important point is to limit the size of the page file to keep it from filling up your local drives. This has become even more important with the use of local SSD drives, as they tend to be rather small to keep costs down. I do however not recommend setting a value lower than 8GiB, even if you have two terabytes of RAM running downhill at warp speed with turbo engaged. Windows 2012 seems to have more reasonable automation algorithms than those found in Windows 2008, but I see no reason to trust the automation,  as they are probably controlled by the mood of a nearby squirrel. Furthermore, if you are ever in a situation where you need more than the prescribed default page file size on a physical server with more than 64GiB of RAM, the page file is not going to save you. It will only slow down the inevitable decent into the abyss of dreadful performance from which a hard reboot may be the only way out.

Changing the page file size on Windows 2008-2012

clip_image004

clip_image005


image


Powershell script

The following script automates the process.

#######################################################################################################################
#   _____     __     ______     ______     __  __     ______     ______     _____     ______     ______     ______    #
#  /\  __-.  /\ \   /\___  \   /\___  \   /\ \_\ \   /\  == \   /\  __ \   /\  __-.  /\  ___\   /\  ___\   /\  == \   #
#  \ \ \/\ \ \ \ \  \/_/  /__  \/_/  /__  \ \____ \  \ \  __<   \ \  __ \  \ \ \/\ \ \ \ \__ \  \ \  __\   \ \  __<   #
#   \ \____-  \ \_\   /\_____\   /\_____\  \/\_____\  \ \_____\  \ \_\ \_\  \ \____-  \ \_____\  \ \_____\  \ \_\ \_\ #
#    \/____/   \/_/   \/_____/   \/_____/   \/_____/   \/_____/   \/_/\/_/   \/____/   \/_____/   \/_____/   \/_/ /_/ #
#                                                                                                                     #
#                                                   http://lokna.no                                                   #
#---------------------------------------------------------------------------------------------------------------------#
#                                          -----=== Elevation required ===----                                        #
#---------------------------------------------------------------------------------------------------------------------#
# Purpose: Change page file size                                                                                      #
#                                                                                                                     #
#=====================================================================================================================#
# Notes:                                                                                                              #
#                                                                                                                     #
# Set a fixed pagefile size. Asumes there is only one page file. Size in MB. Changes are applied at next boot.        #
# 32GB RAM	8 + (32-8)/8 = 11 	11*1024=11264                                                                         #
# 48GB RAM	8 + (48-8)/8=13 	13*1024=13312                                                                         #
# 64GB RAM	8 + (64-8)/8 = 15 	15*1024=15360                                                                         #
# 128GB RAM	 8 + (128-8)/8 = 23 	23*1024=23552                                                                     #
# 256GB RAM	 8 + (256-8)/8 = 39 	39 * 1024 = 39936                                                                 #
# 384GB RAM	8+(384-8)/8 = 55 	50 * 1024 = 51200                                                                     #
# 768GB RAM	8+(768-8)/8=103  	50 * 1024 = 51200                                                                     #
#                                                                                                                     #
#######################################################################################################################


##Set a fixed pagefile size. Asumes there is only one page file. Size in MB. Changes are applied at next boot.


$RAM = ((Get-WmiObject -Class "Win32_ComputerSystem" -Namespace "root\CIMV2").TotalPhysicalMemory | Measure-Object -Sum).Sum/1GB
$PageFileSize = (8 + ($RAM - 8)/8) * 1Kb 

if ($PageFileSize -gt 51200)
{
    $PageFileSize = 51200
}  

Set-CimInstance -Query "Select * from win32_computersystem" -Property @{automaticmanagedpagefile="False"}
Set-CimInstance -Query "Select * from win32_PageFileSetting" -Property @{InitialSize=$PageFileSize;MaximumSize=$PageFileSize}

Proxy for cluster nodes

This post is part of the Failover Cluster Checklist series.

If you have to use a proxy server to reach the internet for patches etc from your datacenter, you should define a fixed proxy setting on your cluster nodes. If you do not, some installers will fail or complain about not being able to download the latest updates.

In internet explorer for the user you use during installation

image

From cmd or powershell for all users and programs without explicit proxy settings

Only complete this step if you get errors after setting proxy settings for the user. MSSQL cluster installations require this setting in some environments, and it is recommended for cluster aware updating.

netsh winhttp set proxy [proxy server name:port] bypass-list=”*.[AD domain fqdn];local”

Sample: netsh winhttp set proxy 192.168.34.2:8000 bypass-list=”*.fabrikam.com;local”

image

Networks, teaming and heartbeats for clusters

Introduction

In this guide, a fabric is a separate network infrastructure, be it SAN, WAN or LAN. A network may or may not be connected to a dedicated fabric. Some fabrics have more than one network.

The cluster nodes should be connected to each other over at least two independent networks/fabrics. The more independent the better. Ideally, the networks should share no components at all, but as a minimum they should be connected to separate NICs in the server. Ergo, if you want to use NIC teaming you should have at least 4 physical network ports on at least two separate NICs. The more the merrier, but be aware that as with all other forms of redundancy, higher redundancy equals higher complexity.

If you do not have more than one network port or only one network team, do not add an additional virtual network adapter/vlan for “heartbeat purposes”. The most prevalent network faults today are caused by someone unplugging the wrong cable, deactivating the wrong switch port or other user errors. Having separate vlans over the same physical infrastructure rarely offers any protection from this. You are better off just using the one adapter/team.

Previously, each Windows cluster needed a separate heartbeat network used to detect node failures. From Windows 2008 and newer (and maybe also on 2003) the “heartbeat” traffic is sent over all available networks between the cluster nodes unless we manually block it on specific cluster networks. Thus, we no longer need a separate dedicated heartbeat network, but adding a second network ensures that the cluster will survive failures on the primary network. Some cluster roles such as Hyper-V require multiple networks, so check what the requirements are for your specific implementation.

Quick takeaway

If you are designing a cluster and need a quick no-nonsense guideline regarding networks, here it comes:

  • If you use shared storage, you need at least 3 separate fabrics
  • If you use local storage, you need at least 2 separate fabrics

All but a few clusters I have been troubleshooting have had serious shortcomings and design failures in the networking department. The top problems:

  • Way to few fabrics.
  • Mixing storage and network traffic on the same fabric
  • Mixing internal and external traffic on the same fabric
  • Outdated faulty NIC firmware and drivers
  • Bad, poorly designed NICs from Qlogic and Emulex
  • Converged networking

Do not set yourself up for failure.

IPv6

If you haven’t implemented IPv6 yet in your datacenter, you should disable IPv6 on all cluster nodes. If you don’t, you run a high risk of unnecessary failovers due to IPv6 to IPv4 conversion mishaps on the failover cluster virtual adapter. As long as IPv6 is active on the server, the failover cluster virtual adapter will use IPv6, even if none of the cluster networks have a valid IPv6 address. This causes all heartbeat traffic to be converted to/from IPv4 on the fly, which sometimes will fail. If you want to use IPv6, make sure all cluster nodes and domain controllers have a valid IPv6 address that is not link local (fe80:), and make sure you have routers, switches and firewalls that support IPv6 and are configured properly. You will also need IPv6 dns in the active directory domain.

Disabling IPv6

Do NOT disable IPv6 on the network adapters. The protocol binding for IPv6 should be enabled:

clip_image001

Instead, use the DisabledComponents registry setting. See Disable IPv6 for details.

clip_image003

Storage networks

If you use IP-based storage like ISCSI, SMB or FCOE, make sure you do not mix it with other traffic. Dedicated physical adapters should always be used for storage traffic. Moreover, if you are one of the unlucky few using FCOE you should seriously consider converting to FC or SMB3.

Hyper-V networks

In a perfect world, you should have six or more separate networks/fabrics for Hyper-v clusters. Sadly though, the world is seldom perfect. The absolute minimum for production clusters is two networks. Using only one network in production will cause nothing but trouble, so please do not try. Determining whether or not to use teaming also complicates matters further. As a general guide, I would strongly recommend that you always have a dedicated storage fabric with HA, that is teaming or MPIO, unless you use local storage on the cluster nodes. The storage connection is the most important one in any form of cluster. If the storage connection fails, everything else falls apart in seconds. For the other networks, throughput is more important than high availability. If you have to make a choice between HA and separate fabrics, chose separate fabrics for all other networks than the storage network.

7 Physical networks/fabrics

· Internal/Cluster/CSV (if local)/Heartbeat

· Public network for VMs

· VM Host management

· Live Migration

· 2*Storage (ISCSI, FC, SMB3)

· Backup

5 Physical networks/fabrics

· Internal/Cluster/CSV (if local)/Heartbeat/Live Migration

· Public network for vm, VM guest management

· VM Host management

· 2*Storage (ISCSI, FC, SMB3)

4 Physical networks/fabrics

· Internal/Live Migration

· Public & Management

· 2*Storage

Example

clip_image004

Most blade server chasses today have a total of six fabric backplanes, grouped in three groups where each group connects to a separate adapter in the blade. Thus, each network adapter or FC HBA is connected to two separate fabrics/backplanes. The groups could be named A,B and C, with the fabrics named A1, A2, B1 and so on. Each group should have identical backplanes, that is the backplane in A1 should be the same model as the backplane in A2.

If we have Fibrechannel (FC) backplanes in group A, and 10G Ethernet backplanes in group B & C, we have several possible implementations. Group A will always be storage in this example, as FC is a dedicated storage network.

clip_image005

Here, we have teaming implemented on both B and C. Thus, we use the 4 networks configuration from above, splitting our traffic in Internal and Public/Management. This implementation may generate some conflicts during Live Migrations, but in return we get High Availability for all groups.

clip_image006

By splitting group B and C in two single ports, we get 5 fabrics and a more granulated separation of traffic at the cost of High Availability.

Hyper-V trunk adapters/teams on 2012

If you are using Hyper-V virtual switches bound to a physical port or team on you Hyper-V hosts, Hyper-V Extensible Virtual Switch should be the only bound protocol. Note: Do not change these settings manually, Hyper-V manager will change the settings automatically when you configure the virtual switch. If you bind the Hyper-V Extensible virtual switch protocol manually, creation of the virtual switch may fail.

clip_image007

Teaming in Windows 2012

In Windows 2012 we finally got native support for nic teaming. You access the nic teaming dialog from Server Manager. You can find a short description of the features here: http://technet.microsoft.com/en-us/library/hh831648.aspx, and a more detailed one here: Windows Server 2012 NIC Teaming (LBFO) Deployment and Management.

Native teaming support rids us of some of the problems related to unstable vendor teaming drivers, and makes setup of nic teaming a unified experience no matter what nics you are using. Note: never use nic teaming on ISCSI networks. Use MPIO instead.

A note on Active/Active teaming

It is possible to use active active teaming, thus aggregating the bandwidth of two or more adapters to support higher throughput. This is a fantastic technology, especially on 1G ethernet adapters where bandwidth congestion can become a problem. There is, however a snag; a lot of professional datacenters have a complete ban on active/active teaming due to years of teaming problems. I have my self been victim of unstable active/active teams, so I know this to be a real issue. I do think this is less of a problem in Windows 2012 than it was on previous versions, but there may still be configurations that just does not work. The more complex your network infrastructure is, the less likely active/active teaming is to work. Connecting all members in the team to the same switch increases the chance of success. This also makes the team dependent on a single switch of course, but if the alternative is bandwidth congestion or no teaming at all, it does not really matter.

I recommend talking to your local network specialist about teaming before creating a design dependent on active/active teaming.

Using multiple vlans per adapter or team

It has become common practice to use more than one vlan per team, or even more than one vlan per adapter. I do not recommend this for clusters, with the exception of adapters/teams connected to a Hyper-V switch. An especially stupid thing to do is mixing ISCSI traffic with other traffic on the same physical adapter. I have dealt with the aftermath of such a setup, and it does not look pretty unless data corruption is your kind of fun. And if you create a second vlan just to get an internal network for cluster heartbeat traffic on the same physical adapters you are using for client connections, you are not really achieving anything other than making your cluster more complex. The cluster validation report will even warn you about this, as it will detect more than one interface with the same MAC address.

How to disable IPv6

Binding for IPv6 should be enabled on all physical nics, uinless they are part of a team, in which case it should already be disabled. Virtual team nics should have IPv6 enabled if IPv4 is enabled. disabled on team virtual nics. The important point is to avoid a situation where the IPv4 binding is enabled, but not IPv6.

Physical nics should look like this:

SNAGHTMLa46429e

Or like this:

image

But never like this:

image

IPv6 should be disabled through the creation of the DisabledComponents registry key.

clip_image005

You can use the following powershell command to read the registry key:

(get-ItemProperty -Path HKLM:\SYSTEM\CurrentControlSet\services\TCPIP6\Parameters -Name DisabledComponents).DisabledComponents

clip_image006

And you can use this command to create or update it if it doesn’t exist or has the wrong value. A reboot is required to apply the changes.

New-ItemProperty -Path HKLM:\SYSTEM\CurrentControlSet\services\TCPIP6\Parameters -Name DisabledComponents -PropertyType DWord -Value 0xffffffff

clip_image007